Mrs. Gus is here!
- Darae
- Nov 13, 2021
- 2 min read

Here she is, a perfect companion to Mr. Gus.
She is elegant and practical, choosing to keep her pockets hidden away, while Mr. Gus likes to show off his bells and whistles. There are 9 pockets in all, with customizable widths to meet your needs.


I'm very pleased with how Mrs. Gus turned out and am happy to share this variation with you!

Happy making!
Materials :
To make Mrs. Gus, you will need the original Gus Tool bag pattern. There are no changes to the original instruction unless otherwise noted here.

* Please refer to the the original pattern instruction to substitute with the steps outlined below
WS=wrong side RS=right side
Step 1
1. Fuse interfacing to the wrong side of Exterior panel with Pellon 808/809, and Pocket panel & Pocket Lining panel with Pellon SF101.
Step 2 & 3
As per original instruction
Step 4
1. Pin the top and bottom edge of Pocket Panel to the Pocket Lining Panel, right sides facing. Stitch with a 1/4"[6mm] seam allowance.
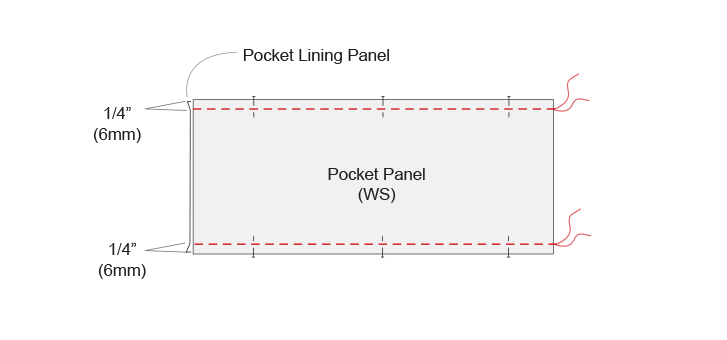
2. Press seam open and turn it right side out. Topstitch the top side of the assembled Pocket piece, with a 1/4"[6mm] seam allowance. Repeat to assemble remaining Pocket Panel.

Step 5
1. Press the long edges of the Base Panel 3/8"[1cm] towards the wrong side of the fabric. Set aside.

Step 6
1. Place the Base Panel (right side up) on top of the assembled Exterior Panel. Equal spacing of Exterior Panels will ensure Base Panel seams to line up properly later. Pin carefully through both layers and edgestitch across the long edge. Then topstitch again 1/4"[6mm] below the edge of the base through all layers.
2. Flip the panel over, wrong side up and follow the instructions on the original pattern, steps 6c-6e.

Step 7
1. Place the assembled Pocket Panel (right side up) on top of the Lining Panel (right side
up).
2. Baste the sides of the Pocket Panel and the Lining Panel.
3. Edgestitch the bottom long edge of the Pocket Panel.
4. Repeat for the other Pocket Panel.
5. Follow the original instruction Step 7 a-b to sew the Pocket Dividers.

Step 8
1. Omit Step 8, as the handles are going to be attached later on.
Step 9 - 12
1. Follow the original instruction. Here's a view of Step 9a for this variation.

Step 13
1. Attach Leather Handles using double cap rivets. I used a medium size double cap rivets with 7mm die. The handle spacing suggested below is for the Small Gus bag, but you can vary it to suit your need.


All done!
If you'd like additional compartments, here's a free pattern for making these cube inserts.


Stay safe, and happy sewing!
Kindly,

Please share your lovely makes on social media using hashtag #indigobirddesign #mrsgusbag #gusbin #guscube


Oh can’t wait to try this one! I love my Gus!
Thank you so very much for sharing this variation so quickly! I had just printed out my gus last weekend and have been gathering my supplies. Hopefully I will have a Mr&Mrs Gus and three little gus-ettes very soon.